Front
- Front Camera
- Speaker / Receiver
- P/L Sensor
- Display
- T9 Keyboard
- Main Microphone
Quick Guide
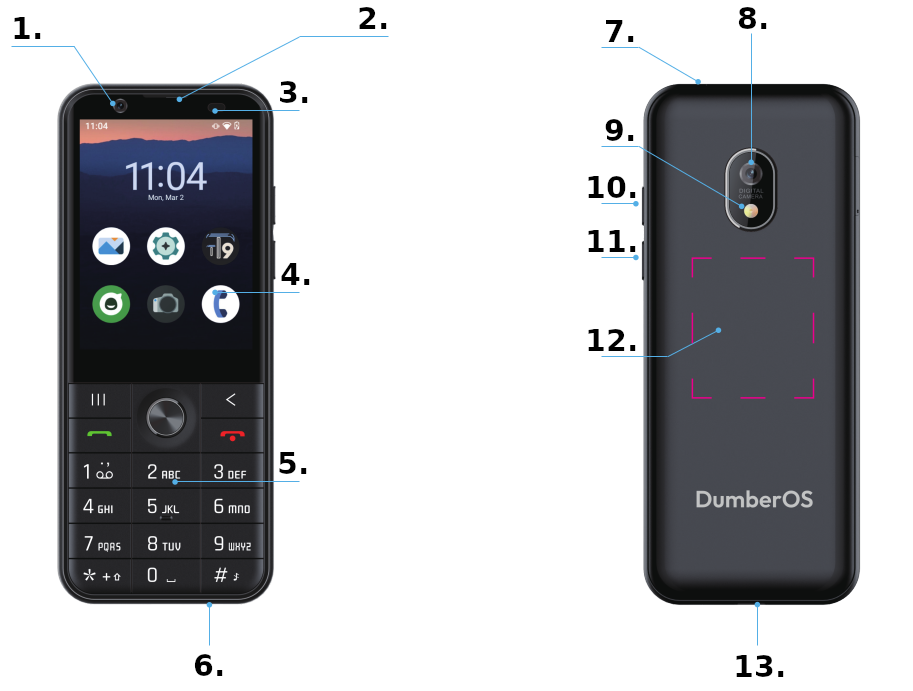
Front
Back
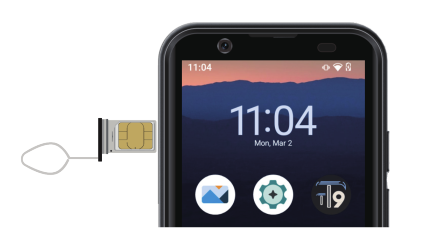
Insert the SIM card provided by your mobile service provider.
You can insert two SIM cards to use two phone numbers on a single device. In some areas, data transfer speeds may be slower when two SIM cards are inserted than when only one SIM card is inserted.
Insert the ejection pin into the hole on the tray to loosen the tray.
Pull out the tray gently from the tray slot.
Remove the SIM card.
Insert the tray back into the tray slot.
Charge the battery before using the device for the first time or when it has been unused for extended periods.
Connecting the charger improperly may cause serious damage to the device. Any damage caused by misuse is not covered by the warranty.
To save energy, unplug the charger when it is not in use. The charger does not have a power switch, so you must unplug it from the electric socket to avoid wasting power. The charger should remain close to the electric socket and easily accessible while charging.
Connect the USB cable to the USB power adaptor.
Plug the USB cable into the device’s multipurpose jack. See the diagram.
Plug the USB power adaptor into an electric socket.
After fully charging, disconnect the charger from the device. Then, unplug the charger from the electric socket.
While charging, the device and the charger may become hot. This does not affect the device’s lifespan or performance and is within the device’s normal operating range. If the battery becomes too hot, the charger may stop charging.
Do the following when the device heats up:
Disconnect the charger from the device and close any running apps. Wait for the device to cool down and then begin charging the device again.
If the lower part of the device overheats, it could be because the connected USB cable is damaged. Replace the damaged USB cable with a new one.
When you use features or apps that require more power, or use them for extended periods, your device may temporarily heat up due to increased battery consumption. Close any running apps and do not use the device for a while.
The following are examples of situations in which the device may overheat. Depending on the functions and apps you use, these examples may not apply to your model.
Do the following when the device heats up:







Pressing the menu key ( , top right) opens the notification panel. Here
you can browse notifications using D-pad up and down, dismiss them using D-pad left, and
open them using D-pad center.
Pressing the menu key again opens Quick Settings, where you can change the volume, toggle airplane mode, or change the audio profile. Use the D-pad up, down, left, and right keys to navigate and change settings.
Some applications may not render correctly on the small screen of the Dumber Mini. Typical scenarios involve important UI elements being drawn off the screen or overlapping each other, preventing interaction.
For such cases, use the Zoom out screen option. This is available in the
“Recent Apps” menu. To access it, press and hold the menu ( ) button and
select “Zoom out screen”. When you no longer need the “Zoom out” feature, select the same
button to turn it off.
Important notifications, such as missed calls or new text messages, will turn on the keyboard
backlight, even while the screen is off. This feature can be turned off in
Settings->Notifications->Notification Light.
The same menu can be used to allowlist other apps so their notifications also turn on the
backlight. The keyboard backlight is always on by default while the screen is on.
This can be disabled in Settings->System->Keyboard.
DumberOS includes the open-source TT9 app for typing text. Until TT9 is configured, the system will use the default Android on-screen keyboard.
To configure TT9, either follow the instructions in the setup wizard or tap the TT9 icon in the app drawer.
In the app’s “Initial Setup”, make sure the keyboard is enabled, TT9 is selected as the default keyboard, and the system spell checker is disabled.
Go back to the top-level TT9 menu and select Languages. Make sure your chosen languages are enabled, then select Load Selected to download the appropriate dictionary files.
TT9 is now enabled for typing. When a text input field is focused, the app’s interface should appear at the bottom of the screen. You can now use the phone’s keys to type text!
If you want to enter text but the interface is not visible, try tapping the text field or press the # key.
While typing, press the # key to cycle between the ABC, 123, and predictive modes. Long-press the # key to cycle between available languages.
In some situations it’s more convenient to use the on-screen keyboard (for example to enter a password). To switch, hold the * key and press 8, or select the last item in the bottom menu. When using the on-screen keyboard, hold the space bar to switch back to TT9.
For a complete manual, please visit: https://ddmio.eu/tt9
DumberOS includes a small collection of Android apps available to install, such as WhatsApp, Maps, Music Player, Uber, etc. These apps are tested and confirmed to work well on the device. To access them, open “More Apps” on your main screen.
For a wider range of applications, you can install Aurora Store, also available under “More Apps”. Please note that not all applications available there are compatible with DumberOS.
We recognize that some customers want to limit the set of apps available on the device, for example in order to avoid social media or to make the phone more child-safe.
To block apps, go to Settings->App Blocker. You can optionally set a PIN
that will lock this setting in the future (this is separate from the device lock PIN). In
App Blocker, you can temporarily or permanently block an app or disable app installation.
Permanently blocked apps or the access PIN can only be reversed by factory resetting the
phone.
Dumber Mini features an NFC sensor that supports contactless payments. It’s important to note that Google Pay is not compatible with DumberOS, so you will need to use a different application.
We recommend Curve Pay for customers based in the European Union, as well as in the United Kingdom, Norway, Iceland, Liechtenstein, and Switzerland.
It’s also worth checking whether your local bank’s app supports direct NFC payments (not through Google Wallet).
Settings->Network&Internet->SIMs->Your Carrier->Mobile data. If you are roaming, make sure “Roaming” is also enabled on that page.Settings->Network&Internet->Your Carrier->Access Point Names. Consult your carrier’s documentation for the correct APN setup.Settings->Network&Internet->SIMs->Your Carrier->VoLTE or 4G calling is enabled.Despite the error message, this is not related to your WhatsApp installation. It occurs because the Dumber Mini is not a Google-certified device. To work around this issue, please add your Dumber Mini as a linked device in WhatsApp. Consult WhatsApp documentation for details.
Your DumberOS device is not rooted and is fully secure. However, it is not certified by Google, which some apps assume as a security requirement. We are constantly looking for ways to make the most popular apps compatible, but for some apps this is simply not possible. Please write to us about the app you are trying to use, and consider getting in touch with the app’s developer to raise the issue as well.
The expected battery life of the Dumber Mini is approximately 1.5 to 2 days with moderate usage. If your phone doesn’t last through the day, we can assume that something is draining the battery abnormally.
Settings->Battery->Battery Usage and check whether any of the installed apps are using more battery than expected. Note that the app “Trebuchet” is the system launcher and is often incorrectly reported as draining the battery.The power/end call button on the Dumber Mini is positioned in a way that makes accidental presses fairly easy. Pressing it opens the lock screen, where you can change some settings or, after holding it for a few more seconds, call emergency services. Holding the power button for ten seconds or more causes the phone to reboot in any situation.
If your phone uses a PIN screen lock, it’s possible to start entering the PIN even
when the screen is off. To turn this feature off, go to
Settings->Security->Device Unlock->Screen lock settings (the gear
icon on the right), and toggle “Wake screen with PIN keys”.
We recommend using a protective case and avoiding tight pockets to prevent accidental key presses.
If your issue is not resolved, please do not hesitate to get in touch with us at: